Needle Flame Test Apparatus China Manufacturer
Needle Flame Tester is used to determine the fire hazard of electrotechnical equipment, sub-assemblies and components, and solid electrical insulating materials or other combustible materials by simulating the effect of a small flame resulting from fault conditions.
The needle flame test is a vital method of assessing flame resistance. Electronic or electrical products may cause flames due to fault reasons, such as fault current, overheating of components or parts, and poor contact, which may spread to nearby parts and cause serious consequences. The needle flame tester may be used for small parts or components if the glow wire tester or the horizontal-vertical fire tester is not suitable for them.
The needle flame tester is widely used in the research, production, and quality inspection of the lighting, low-voltage electrical appliances, household appliances, machine tool electrical appliances, motors, power tools, electronic instruments, electrical connectors, accessories, and other electrical and electronic equipment and its components and assemblies. It is also applicable to insulating materials, engineering plastics, and other solid combustible materials.
Needle Flame Test Standards
IEC60695-11-5, GB5169.5, GB4706.1
A needle-shaped burner with an inner diameter of 0.5 mm, an outer diameter of less than or equal to 0.9 mm, and a length greater than or equal to 35 mm is filled with a specific gas. After being ignited, the test flame is applied to the test specimen at an angle of 45° from the vertical for a defined duration. Whether the test specimen or/and the specified layer is ignited and self-sustaining burning time and burning extent are used to assess the fire hazard of small flames inside equipment caused by fault conditions.
| Model | AT-P6019 |
| Chamber Volume | 0.5³ (Larger sizes can be tailored) |
| Burner Size | Length ≥ 35 mm, bore dia.: 0.5 mm ± 0.1 mm, outer dia.≤ 0.9 mm |
| Flame Application Angle | 45° |
| Standardized Layer | A 10 mm thick pinewood board covered in close contact with a layer of wrapping tissue |
| Flame Application Time | 0 ~ 999.9 s ± 0.1 s (adjustable) |
| Self-sustaining Burning Time | 0 ~ 999.9 s |
| Flame Height | 12 mm ± 1 mm (adjustable) |
| Gas | Butane (prepared by users) |
| Temperature Sensor | K-type thermocouple |
| Extraction Device | Built-in exhaust fan |
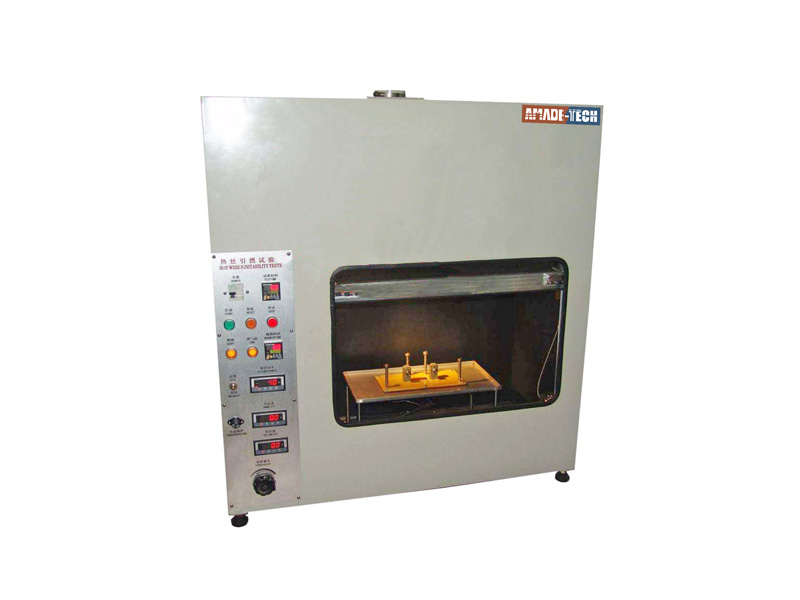
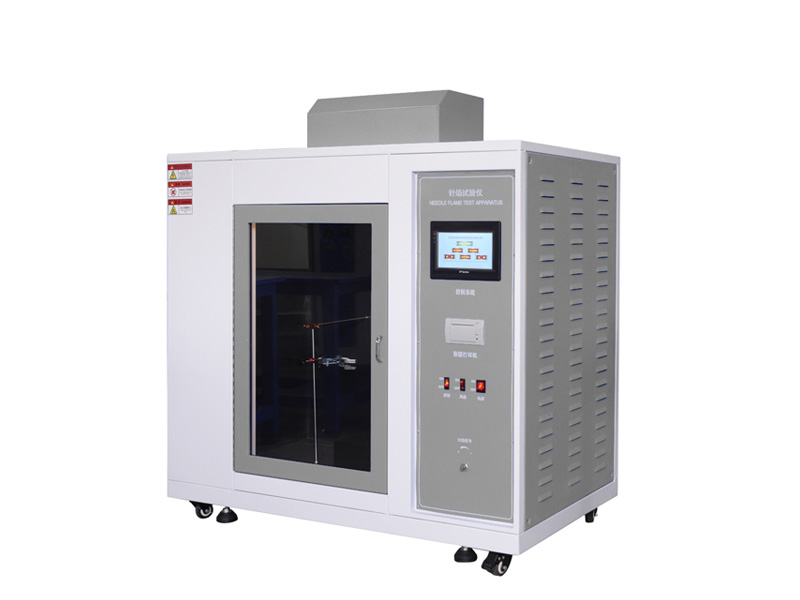
Test Chamber
The Needle Flame Test Apparatus features a chamber with an interior volume of 0.5 m³. Other larger dimensions are available based on clients’ requirements. The test chamber features a non-ventilated environment while ensuring normal airflow around the specimen.
We have configured a glass door in the front of the test chamber to allow you to observe the ongoing test’s status easily. The surface of the inner wall of the test chamber is dark, and there are lighting lamps inside the box. The chamber is equipped with an independent exhaust system to discharge toxic combustion products after the test.
Test Flame Temperature Measuring Device
We have equipped this needle flame tester with a K-type thermocouple with a high temperature of 1100 degrees as a temperature sensing element to determine whether the flame temperature is qualified.
A qualified flame temperature requires the temperature sensing element to rise from 100 degrees Celsius to 700 degrees Celsius within 23.5 seconds. The built-in timer will automatically time the temperature and display the value on the screen.
Burner
The needle-shaped burner with an inner diameter of 0.5 mm, an outer diameter of 0.9 mm, and a length of 35 mm is located inside the chamber. It is attached to a movable apparatus guided by metal rods.
The burner is supplied with propane or butane whose purity is not less than 95%(Under normal circumstances, you need to prepare your gas), configured with a control valve to adjust the flame height. The overall allowable height of the application flame is 12 mm ± 1 mm when it is vertical. We will give you a gauge to assist in measuring the height.
The burner can automatically reach the designated flame application site under control, continuously apply flame to the sample within the specified time, and automatically return to the starting point after the flame application is completed. This Needle Flame Tester is equipped with a timing device to record the self-sustaining burning time of the specimen.
Layer
In order to assess the likelihood of fire spreading when the specimen burns, a specified layer or a standardized layer shall be placed underneath the test specimen at a given distance.
When applicable to the specified layer, a layer of the material or components surrounding or underneath the specimen in the actual application shall be placed beneath the test specimen. The distance between the specimen and the layer shall be the same as that in regular use.
If the specimen is a separate one without surrounding materials, a standardized layer is necessary. It is a 10 mm thick smooth wooden board covered with a layer of wrapping tissue and placed 200 mm below the flame application point of the sample.
Needle Flame Test Procedure
Before the needle flame test, you need to condition the test specimen and the wooden board covered with a layer of the tissue in an environment of temperature between 15℃ and 35℃ and relative humidity between 45% and 75% for not less than 24 hours. The test specimens shall be tested within 1 hour once they are taken out from the conditioning atmosphere.
- Sample Mounting
Turn on the lights inside the chamber, and open the chamber door to clamp the specimen. You need to ensure that the specimen is arranged in a normal use position such that ignition is most likely to occur during the test.
Place a layer of the material or components usually surrounding or situated underneath the specimen, maintaining a distance the same as that in the application. If the surrounding materials and distances are unknown, you need to place a piece of a flat smooth wooden board with 10 mm in thickness covered with a single layer of wrapping tissue below the flame application point on the specimen at a distance of (200 ± 5) mm.
- Burner Position Presetting
The carriage inside the chamber is activated to automatically move to a position near the underside of the specimen. You are required to adjust the vertical burner tube to tilt 45 degrees.
With the provided gauges, a spacing between the center of the top of the burner and the remaining portion of the test specimen during the test shall be maintained at (8 ± 1) mm (applicable when the specimen is vertically above the test flame) or (5 ± 1) mm (applicable when the specimen is located horizontally from the test flame) by adjusting the specimen up, down, left or right.
When the position of applying flame is determined, adjust the proximity switch of the carriage to the matching position. During the test, the carriage will automatically stop after moving to the specified position.
- Flame Height Calibration
Reset the carriage to the initial position and restore the burner tube to the vertical state. Turn on the gas supply switch to ensure that the specified gas flows in the burner tube. You can light the test flame with an ignition device such as a lighter, then turn off the light inside the chamber to provide a dark background to calibrate the flame height. The flame height is controlled by rotating the gas source control valve to adjust the gas flow rate.
We will configure a unique gauge with the instrument to assist in this step. The required overall height of the test flame has to be maintained at (12±1) mm. Wait for a minimum of 5 min to allow the burner conditions to reach equilibrium.
- Flame Temperature Measurement
Before the test, we need to test whether the temperature of the flame reaches the specified standard. Slide the temperature measuring assembly on the top inside the test chamber to the appropriate position. Manually place the copper block with built-in temperature sensing element K-type thermocouple in the flame, turn on the temperature test switch, and the digital screen will automatically start to display its real-time temperature.
When the temperature reaches 100 degrees, the timer starts to count automatically and stops when it reaches 700 degrees. The time not more than (23.5 ± 1) seconds for the copper block to hear up from (100 ± 5) degrees Celsius to (700 ± 3) degrees Celsius is qualified. For more detailed flame temperature test methods, please refer to Annex A of the IEC 60695-11-5.
- Flame Application
Set the necessary parameters on the operation panel and start the test. Rotate the burner so that the burner tube is positioned at 45 degrees from the vertical. Turn on the automatic displacement switch of the carriage, and the carriage will automatically move to the flame application point just set to start applying flame to the specimen.
After the specified flame-application time arrives, the carriage will automatically return to the starting point. The instrument will automatically start recording the self-sustaining burning time when the test flame is removed.
When the flame is completely extinguished, or glowing combustion is invisible, press the timer pause button to get the burning duration of the needle flame test. Test other samples are in the same way. Usually, the test is performed on three test specimens.
- Observations and Measurements
You are required to measure and record the duration of burning from the moment the test flame is removed from the specimen until the last flames have extinguished and the glowing combustion of the specimen, the specified layer, and/or the surrounding parts is no longer visible.
- Evaluation of Test Results
A sample passes the needle flame test as long as either of the following two conditions is satisfied:
- No ignition of the specified layer, no flame, and no glowing of the specimen after the removal of the needle flame.
- Flames or glowing of the test specimen and the surrounding parts extinguish within 30 seconds after the removal of the test flame. Also, the surrounding parts have not burnt away entirely, and there has been no ignition of the specified layer.
Send an Enquiry
Please feel free to contact us for more details on the product, price, lead time, payment terms, shipment methods, etc. AMADE TECH sales specialists will respond within one working day.