AATCC 127 Fabric Hydrostatic Tester China Supplier
Hydrostatic Pressure Tester is an important fabric testing equipment used for determining the resistance of fabrics to penetration by water under hydrostatic pressure.
A sheet of the fabric test piece is clamped on the hydrostatic head. One surface of the test piece is subjected to increasing water pressure at a constant speed from the bottom until the penetration of 3 points occurs on its upper surface. The pressure at which the water penetrates the test piece at the third place is recorded under control.
It is suitable for all kinds of fabrics whether or not they have been given a water-resistant or water-repellent finish.
AmadeTech Hydrostatic Head Tester is an electric test machine free from manual pressurization. Thanks to a set of in-built pressurization systems and industrial-grade microprocessors, It enables you to set a desired water pressure increase rate. The machine will generate a steadily increasing water pressure acting on the sample as per the set value during the test. If you have set an target hydrostatic pressure, the pressurization system will automatically adjust the power to maintain a constant pressure when the set pressure is reached. In addition, you are also available to set a constant amount of time for the device to maintain a target pressure.
Our hydrostatic head tester consists of a stainless steel circular reservoir with an area of 100 cm2 to hold test water. There are two bores at the bottom of the reservoir: one is the inlet for the water under high pressure during the test, and the other is the port responsible for water inflow and drainage under control by pressing the corresponding button. A 2500 ml water tank is located below the reservoir to provide enough test water while testing.
Before the specimen mounting, The reservoir needs to be filled with water, and excess water will overflow into the surrounding ring pool and then flow out from the outlet pipe. A piece of sample fabric is required to be placed flat over the entire opening of the reservoir. Then the upper moveable clamping ring is descended by turning the handwheel at the top of the machine to come into contact with the fabric. With the increasing turning force, the fabric is tightly clamped to prevent slip and water leakage at the rim during the test period. In order to further strengthen the sealing performance, we have added a rubber ring to the edge of the lower clamp.
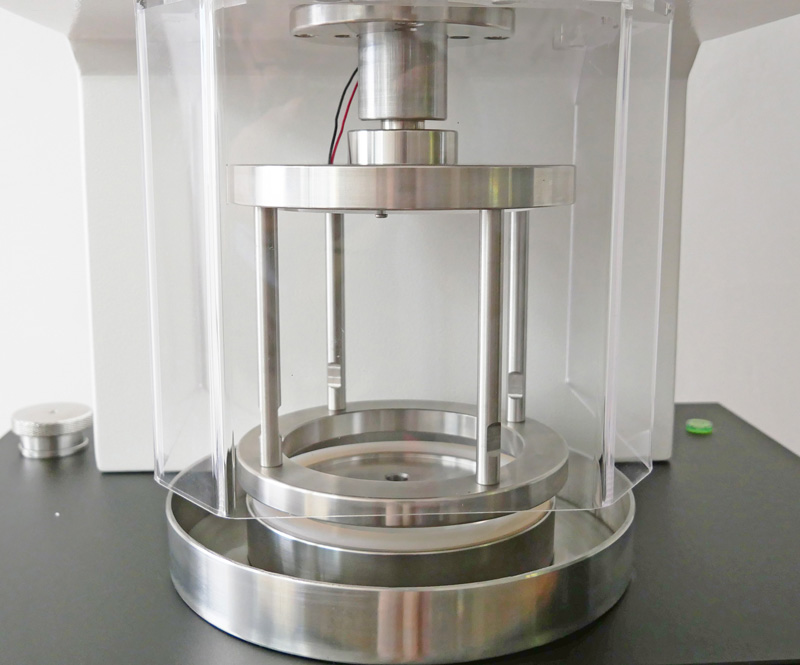
Test area
After pressing the “Start” button, the machine will apply steadily increasing water pressure to the bottom side of an area of the fabric. You need to visually observe the clamping area of the fabric for droplets with the aid of the LED lamp directly above the bulging area. The “Stop” button needs to be pressed once the water penetrates through the third place in the fabric. The hydrostatic water pressure will be automatically recorded in the system and can be printed on-site if needed.
Test Standards
- AATCC 127 Water resistance: Hydrostatic pressure test
- ISO 811 Textiles – Determination of resistance to wear penetration – Hydrostatic pressure test
- ISO 1420 Rubber – or plastics – coated fabrics – determination of resistance to penetration by water
- DIN53886 Determination of resistance of textiles fabrics to water penetration hydrostatic pressure test
- JIS L1092 Testing methods for water resistance of textiles
- EN20811 Textiles – Determination of resistance to water penetration – Hydrostatic pressure test
- EN 13726-3 Non – active medical devices – Test methods for primary wound dressings – Parts 3: waterproofness
Main Technical Parameters
| Model | AT-T4003-C10 | AT-T4003-C20 |
| Measuring Scale | 0 ~ 100 kpa | 0 ~ 200 kpa |
| Test Accuracy | ± 0.2% | ± 0.5% |
| Sample Grip Area | 100 cm2 | |
| Test Units | Pa, KPa, mmH2O, cmH2O, mbar | |
| Hydrostatic Pressure Rising Rate | 60 mbar / min (AATCC 127)
Adjustable steplessly |
|
| Water tank Capacity | 2500 ml | |
| Dimensions | 580 × 400 × 700 mm | |
| Weight | 75 kg | |
| Power supply | 1 phase AC 220V 50/60 Hz or specified | |
Features of Fabric Hydrostatic Head Test Machine
- The housing is formed from cold rolled steel, and the surface is treated with baking paint.
- Equipped with a water tank with a water shortage reminder function.
- A highly precise pressure sensor facilitates accurate, stable, and repeatable test results.
- Characterized by PLC and touch screen to offer sample and convenient operation.
- Supports conversion of multiple hydrostatic pressure display units.
- Supports one-button control for water addition and drainage.
- Fitted with an LED lamp for better inspecting the sample for water leakage appearance during the test.
- The controller can record and calculate the average, maximum, and minimum test values for a total of 5 groups.
- Equipped with a built-in thermal printer.
- Provided with a transparent acrylic protective hood to protect users while testing.
FAQs
Leave Your Message Here
Please feel free to contact us for more details on the product, price, lead time, payment terms, shipment methods, etc. Amadetech sales specialists will respond within one working day.